Preserve your sauna’s longevity by using safe cedar wood cleaning products like pH-neutral solutions and mild castile soap. Avoid damaging bleach or pressure washers on soft, porous grain. Implement a routine of post-session wiping, adequate ventilation, and occasional paraffin oil treatments to prevent stains and maintain the wood's natural aroma.
Sauna Wood Cleaning: Which Products Are Safe for Cedar?
Cedar sauna wood requires careful cleaning to preserve its natural beauty, aroma, and durability. Using the wrong products can permanently damage its soft, porous surface. This article answers a common question: Which products are safe for cleaning cedar sauna wood? You’ll learn which cleaners protect cedar, what to avoid entirely, and how to maintain your outdoor infrared sauna through proper routines, treatments, and everyday habits that extend the life of your investment.
Key Takeaways
- Cedar is soft and porous. Harsh chemicals and soaking cause permanent damage
- Use pH-neutral, sauna-specific, non-bleaching cleaners only
- Never use bleach, pressure washers, paints, or oil-based polishes
- Clean lightly and regularly. Deep clean only a few times per year
- Maintain ventilation and use breathable protective treatments for longevity
Why does Cedar Sauna Wood Need Special Care?

Western Red Cedar and other cedar species dominate luxury home sauna construction because they’re naturally rot-resistant, stay cool to the touch even at high temperatures, and provide that distinctive, pleasant aroma that defines the authentic sauna experience. However, this popularity comes with specific maintenance requirements that many sauna owners overlook.
Cedar is a softwood with open pores that make it vulnerable to damage from inappropriate cleaning methods. Harsh chemicals or aggressive scrubbing can cause raised grain, splintering, or unsightly color blotching that permanently mars the wood surface. The high heat cycles of sauna use (ranging from 70-100°C or 160-212°F) combined with humidity fluctuations cause the wood fibers to expand and contract, making cedar even more susceptible to damage from strong detergents and over-wetting.
Do not use paints or varnishes on cedar sauna wood, as these coatings prevent the wood from breathing. Instead, regularly treat wooden components with a breathable wood preservative to allow the cedar to ventilate and prolong its life.
The primary goal when cleaning cedar sauna wood should be removing sweat, skin oils, and mild staining while preserving the wood’s natural protective resins and aromatic qualities. These natural oils are what give cedar its resistance to decay, mold, and bacteria - properties that support the hot room environment and contribute to minimal maintenance requirements over many years.
Using the wrong cleaner even once can have lasting consequences. Products containing bleach, for example, can permanently lighten patches of cedar or weaken surface fibers, especially on frequently contacted areas like sauna benches and backrests where people sit directly on the wood surface.
What are Safe Cleaning Products for Cedar Sauna Wood?
The best infrared sauna cleaning products offer superior safety compared to generic household cleaners because they’re specifically balanced for unfinished softwoods and designed to withstand high-heat environments without creating safety risks or unpleasant off-gassing. Several commercially available products have proven safe and effective for cedar when used as directed: They include:
- Tikkurila Supi Saunapesu: A mildly alkaline sauna cleaner designed specifically for benches, walls, and ceilings that won’t strip natural oils
- Harvia Sauna Cleanser: pH-balanced formula that breaks down sweat and grime without harsh chemicals
- SaunaLife Sauna Cleaner: Ready-to-use spray that disinfects while maintaining cedar’s natural luster
- Mild castile soap: When diluted strongly (approximately 5ml soap per 1L warm water), provides gentle cleaning action
- Specialized sauna waxes: Keeps surfaces dirt-repellent while maintaining breathability
- Dedicated bench protection: Colorless, water-based treatment that repels moisture and dirt
When selecting any weatherproof outdoor infrared sauna cleaner, look for specific label phrases like “for sauna benches or softwood interior,” “pH-neutral,” “chlorine-free,” and “no wax/oil buildup.” These indicators help ensure the product won’t damage cedar’s delicate structure or create slippery, unsafe surfaces. Be cautious with scented products. They should be heat-safe and free from strong synthetic scents that can smell unpleasant when heated.
Products and Methods to Avoid on Cedar Sauna Wood

- Chlorine bleach and household disinfectant sprays: Cause blotchy fading, fiber damage, and produce harsh fumes that create safety risks in enclosed hot room spaces
- Multi-purpose kitchen/bathroom cleaners containing ammonia or strong solvents that strip away protective oils
- Oil-based furniture polishes, varnishes, or polyurethane: These seal the wood surface, trap heat and moisture, and make benches dangerously slippery
- Paints and varnishes: Should not be used because they seal the cedar and prevent the wood from breathing, which can lead to swelling, cracking, and mold.
- Abrasive powders and scrubbing pads scratch cedar’s soft surface, leaving it more prone to staining and bacterial absorption
Avoid These Methods
- Pressure washers and steam cleaners force water deep into cedar joints, leading to swelling, cracking, and hidden mold growth in the wood structure
- Excessive water application: Cedar should be damp-cleaned, never soaked, as standing moisture penetrates the porous wood and causes long-term damage
Even seemingly natural options require caution. While vinegar appears in many DIY cleaning recipes, it should be used sparingly and only when diluted on cedar. Vinegar’s acidity can etch or dull the wood surface over time, particularly with regular use.
Remember, using bleach or pressure washing methods may void manufacturer warranties on prefab cedar saunas. Always check warranty terms before attempting any cleaning methods that goes beyond manufacturer recommendations.
Remember that disinfecting a sauna like a bathroom is not necessary. Proper heat cycles reaching 80-90°C (176-194°F) and adequate ventilation naturally handle most microbes without requiring harsh surface treatments.
Step-by-Step: Routine Cedar Sauna Cleaning Weekly to Monthly
This comprehensive routine cleaning process forms the foundation of proper sauna maintenance that most cedar sauna owners should follow regularly. The frequency depends on usage. Saunas used daily should be cleaned weekly, while those used less often can be cleaned monthly.
- Step 1 - Cool and Ventilate: Turn off the heater completely and allow the outdoor full-spectrum infrared sauna to cool to below 30°C (86°F) before beginning any cleaning. Open vents or prop the door partially open to let accumulated moisture escape while you work. This step prevents burns and allows cleaning products to work effectively without immediately evaporating
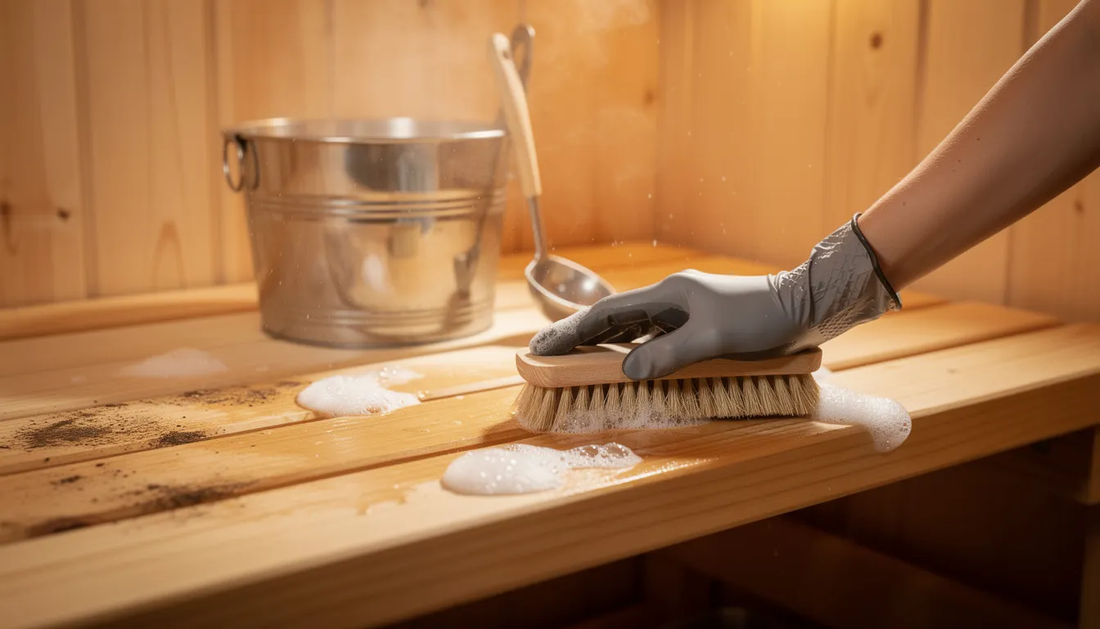
- Step 2 - Dry Clean: Use a soft brush, handheld vacuum with brush attachment, or microfiber cloth to remove loose dust, hair, and debris from all surfaces. Pay special attention to sauna benches, backrests, and floor areas where particles accumulate. This prevents grinding debris into the wood during wet cleaning
- Step 3 - Mix Safe Cleaner: Prepare a bucket with warm (not hot) water and dilute your sauna cleaner according to manufacturer’s directions.

- Step 4 - Wipe Cedar Surfaces: Dip a soft sponge or cloth into the cleaning solution, wring until almost dry, and wipe all cedar surfaces following the wood grain direction. Focus on sauna benches, backrests, walls, and upper floor areas. Keep surfaces damp rather than soaked. Remember, end-grain areas and joints are particularly vulnerable to water damage
- Step 5 - Rinse Lightly: Use a second bucket filled with clean warm water and a fresh cloth to remove any cleaner residue. Again, wring the cloth thoroughly to avoid drips and standing water that can penetrate cedar’s porous structure and create moisture problems
- Step 6 - Dry Thoroughly: Leave the sauna door and vents open for 1-2 hours to allow complete air-drying. Alternatively, run the heater on low (approximately 60°C/140°F) for 30-40 minutes with vents open to speed the drying process and drive out residual moisture. After each use, allow the sauna to dry out completely by propping the duckboards off the floor and leaving the door open
- Step 7 - Final Inspection: Once completely dry, inspect for any dark spots, raised wood fibers, or persistent stains that might require spot-sanding or deeper cleaning attention during your next maintenance session
Routine Tip: Lightly scrub all wooden surfaces after each use to maintain the sauna’s appearance and hygiene. Regularly cleaning and scrubbing the cedar helps keep it looking fresh and prevents buildup. Home saunas used daily benefit from a quick wipe with plain water after each session and a full cleaning every 2–4 weeks. Use soft, white cloths to avoid dye transfer onto light cedar.
How to Deep Clean Cedar: Removing Sweat Stains and Darkening
- Step 1 - Complete Routine Cleaning First: Perform the full routine cleaning process outlined above and allow the cedar to dry completely, ideally overnight. Starting with clean surfaces ensures deep-cleaning products can penetrate stains effectively rather than working through surface dirt and debris
- Step 2 - Spot-Treat Persistent Stains: Mix your sauna cleaner to the strong concentration recommended on the product label. Apply this solution directly to darkened or stained areas using a sponge, allowing the specified contact time for the product to break down embedded residues. For sweat stains on cedar wood, you can also make a paste using 3 parts baking soda to 1 part water and gently scrub the affected areas
- Step 3 - Gentle Scrubbing: Use a soft bristle brush or medium-density nylon brush only where needed, working along the wood grain direction. Avoid aggressive cross-grain scrubbing that can create permanent scratches or raised grain in cedar’s soft surface. Put pressure on the most problematic spots while treating surrounding areas gently
- Step 4 - Thorough Rinsing: Remove all cleaner residue using clean, warm water applied with a well-wrung cloth. Never pour water directly onto cedar surfaces as this can force moisture deep into joints and cause swelling or future mold problems
- Step 5 - Light Sanding for Stubborn Issues: Once the wood has dried completely, address remaining dark spots or rough areas with fine-grit sandpaper (180-220 grit works well). Sand by hand along the grain direction, feathering edges to avoid sharp color transitions. This process releases fresh cedar oils and smooths any raised fibers. Sanding the wood can help remove stronger stains and dirt. For best results, lightly sand the benches once per year to maintain their appearance and condition

- Step 6 - Final Dry-Out: Complete the process with full ventilation and low heat (45-60 minutes at moderate temperatures) to drive out any residual moisture that could lead to future problems. This step also helps newly sanded areas blend with surrounding wood
Always wear a dust mask when sanding cedar and vacuum dust immediately afterward to maintain clean air quality. If stains reappear quickly or black spots spread despite proper cleaning, check for potential moisture issues or ventilation problems that may require professional attention.
Document your progress by photographing benches before and after deep cleaning. This creates a useful reference for monitoring recurring problem areas and tracking the effectiveness of your maintenance routine over time.
Sauna Stone Care: How to Keep Your Heater Stones Clean and Safe
Proper sauna stone care is an essential part of sauna maintenance that often gets overlooked, yet it plays a crucial role in both safety and the quality of your sauna experience. Over time, sauna stones can accumulate dirt, dust, and debris, which not only affects the efficiency of your heater but can also pose a safety risk if left unchecked.
To keep your sauna stones in optimal condition, begin by turning off the heater and allowing the stones to cool completely. Carefully remove the stones from the heater, taking note of their arrangement for easy re-stacking later. Rinse each stone thoroughly with warm water to wash away loose dirt and debris. For any stubborn grime, use a soft brush to gently scrub the stones, ensuring you don’t damage their structure.
After cleaning, rinse the stones again with warm water to remove any remaining residue. Allow the stones to dry fully before placing them back in the heate. This step is essential to prevent moisture from becoming trapped, which could lead to cracks or even a safety risk during heating.
As you handle each stone, inspect it closely for any holes, cracks, or signs of structural weakness. Damaged stones can compromise the heater’s performance and may even create a fire hazard. Replace any stones that show signs of wear to maintain a safe and efficient sauna environment.
Once the stones are dry, re stack them in the heater, ensuring there is enough space between each stone for proper air circulation. This not only helps maintain the stones’ structure but also ensures even heating and optimal steam production. Regular sauna stone maintenance is essential for a safe, enjoyable sauna experience and will help your heater perform at its best for many years.
Paraffin Oil Treatment: How to Condition Cedar for Longevity
Conditioning your cedar sauna benches and walls with paraffin oil is a simple yet highly effective way to protect the wood surface from moisture and extend the life of your sauna. Paraffin oil acts as a barrier, helping cedar resist the absorption of sweat and humidity that can lead to mold, mildew, and premature aging.
To begin, lightly sand the wood surface of your sauna benches and walls. This step smooths out any roughness and opens up the wood’s pores, allowing the paraffin oil to absorb more effectively. After sanding, use a clean, lint-free cloth to apply a thin, even layer of paraffin oil to all exposed cedar surfaces. Be sure to cover the entire area, including any edges or corners where moisture might collect.
Let the oil absorb into the wood for at least an hour, giving it time to penetrate deeply and create a protective barrier. After the absorption period, use a fresh cloth to wipe away any excess oil, ensuring the surface is not left sticky or oily. This not only helps the wood breathe but also prevents any residue from transferring to skin or towels during sauna use.
Repeat this paraffin oil treatment regularly. Consistent conditioning will keep your cedar benches and walls looking vibrant, feeling smooth, and protected from the damaging effects of moisture.
Protective Treatments for Cedar Benches, Walls, and Floors
While cleaning removes accumulated residue and stains, protective treatments make cedar more resistant to future dirt and moisture. These include:
Wall and Ceiling Protection
- Tikkurila Supi Saunawax: Water-based, breathable treatment that keeps surfaces easier to wipe clean while maintaining proper vapor transmission
- Comparable sauna-specific waxes from regional manufacturers designed for interior hot room environments
Bench and Backrest Protection
- Tikkurila Supi Laudesuoja: Colorless, water-based penetrating treatment that repels moisture and sweat without creating slippery surfaces
- Specialized sauna bench oils that remain stable at high temperatures and won’t off-gas harmful compounds

· Application Guidelines
Apply protective treatments only to completely clean and dry cedar, ideally the day after deep cleaning when you’re certain no moisture remains trapped in the wood structure. Use lint-free cloths or soft brushes to apply products in thin coats along the grain direction, ensuring even coverage without pooling or drip marks.
Always wipe away excess product to prevent sticky surfaces and uneven sheen that could compromise safety. Any surface that feels oily or appears glossy should be wiped down or lightly sanded to restore proper texture.
Allow full curing time according to product specifications (typically 4-24 hours) before heating the sauna to normal operating temperatures. This prevents premature breakdown of protective compounds and ensures optimal performance.
· Treatment Frequency
High-use sauna benches should be retreated about once a year, while walls and ceilings usually need treatment every 2–3 years. Increase frequency if surfaces show wear. Benches must stay matte and slightly grippy for safety. Slick or oily finishes are unsafe and should be lightly sanded and reapplied correctly.
Ventilation and Humidity Control for Cedar Saunas
A well-ventilated sauna not only enhances your overall sauna experience by providing a steady supply of fresh air, but it also plays a critical role in maintaining healthy humidity levels and preventing the buildup of bacteria, mold, and mildew.
Cedar, with its natural resistance to moisture, still requires a balanced environment to thrive. Excess humidity and stagnant air can lead to unwanted moisture accumulation, which in turn creates the perfect conditions for mold and bacteria to develop on benches, walls, and other wood surfaces. Over time, this can compromise both the structure and aroma of your cedar sauna.
To keep your sauna in top condition, make sure your hot room is equipped with functional vents, and consider incorporating windows or doors that can be easily opened after each session. After using the home sauna wellness unit, open all vents and, if possible, crack a window or prop the door open to allow humid air to escape and fresh air to circulate. This simple step is one of the most effective ways to reduce excess moisture and maintain a clean, inviting environment.
Regularly inspect vents and air pathways to ensure they are free from dust and debris, as blocked vents can hinder airflow and trap humidity inside the sauna. If your sauna is used frequently, consider scheduling a quick check of these elements as part of your ongoing maintenance routine.
Sauna Maintenance Schedule: How Often to Clean and Treat Cedar
Establishing a consistent sauna maintenance schedule is essential for keeping your sauna clean, safe, and in peak condition. By following a structured routine, you’ll ensure that your cedar benches, walls, and other components remain free from moisture damage, dirt, and wear, delivering a superior sauna experience every time.
- After Each Use: Wipe down all sauna benches, walls, and the floor with a clean, damp cloth to remove sweat and moisture. This quick cleaning step helps prevent stains and keeps bacteria at bay
- Weekly: Use a sauna cleaner to deep clean benches, walls, and the floor, focusing on areas exposed to high humidity. This helps remove any buildup that regular wiping might miss and keeps the wood fresh and hygienic
- Monthly: Inspect the sauna’s exterior walls and vents to ensure they are free from debris and functioning properly. Clear any blockages to maintain optimal airflow and prevent excess humidity from lingering inside the sauna
- Every 3-6 Months: Treat cedar benches and walls with paraffin oil to protect against moisture and extend their longevity. This conditioning step is essential for maintaining the wood’s natural beauty and resistance to mold and mildew
- Annually: Perform a thorough inspection of the sauna’s heater, stones, and overall structure. Check for any signs of wear, damage, or safety risks, such as cracks in the stones or issues with the heater. Address any problems promptly to ensure your sauna remains safe and efficient
What are Everyday Habits That Keep Cedar Cleaner for Longer?
These simple habits helps you determine whether your sauna requires only gentle maintenance or intensive restoration efforts down the road.
Pre-Sauna Preparation
- Shower with mild soap before entering to remove body oils, cosmetics, and skin care products that can stain cedar surfaces
- Use soft, filtered, or softened water when possible to prevent mineral deposits that can create white spots on cedar and sauna stones
- Always sit or lie on clean cotton towels, especially on new or freshly cleaned cedar benches
Post-Session Care
- Quickly wipe benches and backrests with a damp cloth (water only) immediately after use to remove fresh sweat before it sets into the wood
- Open vents and the sauna door for 30-60 minutes after each session, allowing cedar to dry completely and preventing bacterial growth in humid conditions
- Rotate seating areas or move personal towels occasionally so the same bench spots don’t age faster than surrounding wood
Ongoing Maintenance Habits

- Vacuum or brush debris weekly to prevent accumulation that can scratch surfaces during cleaning
- Monitor for early signs of staining or darkening that are easier to address before they become embedded
- Ensure proper ventilation during and after each sauna session to maintain optimal humidity levels
Simple Post-Session Checklist
- Wipe benches with damp cloth
- Open door and vents for air circulation
- Remove any personal items or debris
- Check that heater is properly turned off
- Ensure stones structure and heater area are clear of towels or other materials
Summary
Cleaning cedar sauna wood safely comes down to adopting gentle methods, sauna-specific products, and consistent maintenance. By avoiding harsh chemicals, excess water, and sealing finishes, you preserve cedar’s natural oils and breathability. Routine cleaning, occasional deep care, and smart daily habits prevent staining and long-term damage. Further, protective treatments and proper ventilation further extend cedar’s lifespan.
Use these guidelines to protect your sauna and enjoy a cleaner, longer-lasting cedar hot room.
FAQs
Can I use regular household cleaners on cedar sauna wood?
No. Household cleaners often contain bleach, ammonia, or solvents that strip cedar’s natural oils and damage its fibers. These chemicals can cause discoloration, splintering, and harmful fumes when heated, making them unsafe for sauna environments.
How often should cedar sauna wood be cleaned?
Light wiping after each use is ideal, with routine cleaning weekly or monthly depending on usage. Deep cleaning is usually needed only two to four times per year to remove embedded sweat stains without over-stressing the wood.
Is vinegar safe for cleaning cedar sauna benches?
Vinegar should be used cautiously and only in very mild dilution. Its acidity can dull or etch cedar over time, especially with repeated use. Sauna-specific or pH-neutral cleaners are safer long-term options.
Should cedar sauna wood be sealed or varnished?
No. Paints, varnishes, and polyurethane seal cedar and prevent it from breathing. This traps moisture and heat, leading to cracking, swelling, and mold. Cedar should remain unfinished or treated only with breathable sauna products.
What’s the best way to prevent cedar from darkening?
Showering before sauna use, sitting on towels, wiping benches after sessions, and ensuring proper ventilation all reduce sweat absorption. Occasional light sanding and protective treatments also help maintain cedar’s natural color.
