
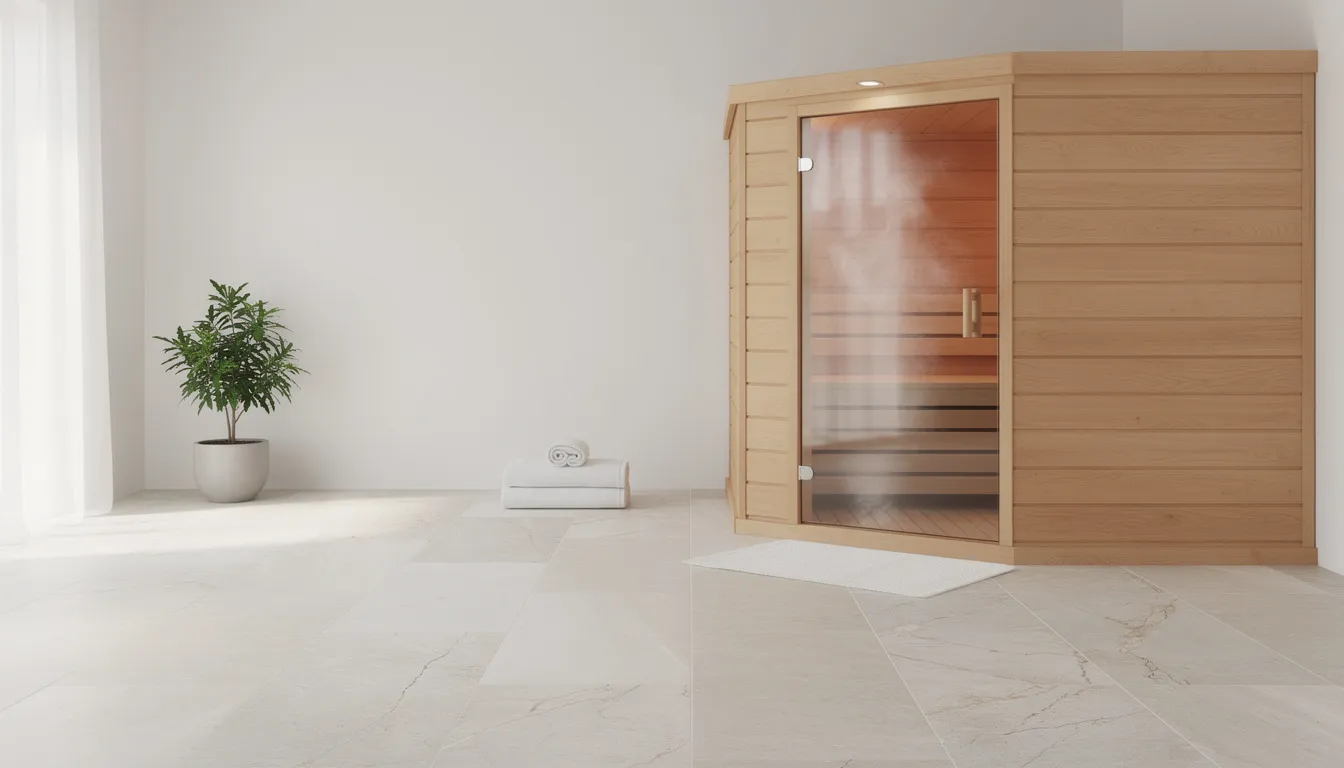
Transform your underutilized square footage into a private spa with a basement sauna. By prioritizing moisture control, ventilation, and electrical safety, you can install a luxury retreat even in compact spaces. Whether choosing a plug-and-play infrared sauna or a traditional model, proper planning ensures a safe, value-adding home wellness sanctuary.
How Do You Safely Build a Basement Sauna in Your Home?
Many homeowners dream of having their own private spa retreat without leaving home. The basement—often an unused space gathering dust and holiday decorations—presents an excellent location for this transformation.
With the right planning and SunHomeSaunas products, you can transform that forgotten square footage into a sanctuary for relaxation and recovery. This comprehensive guide walks you through every step of safely building the best infrared sauna for home use in your basement.
Key Takeaways
- A basement sauna is absolutely possible with proper moisture control, ventilation, load-bearing checks, and electrical planning.
- SunHomeSaunas specializes in 20A dedicated circuit solutions that are ideal for basement installation, requiring minimal construction expertise.
- Both infrared sauna indoor 2-person models and traditional electric saunas work well in basements, but infrared full-spectrum models are usually easier to install (often 120V plug-in) and better suited for lower ceilings common in older homes.
- Careful load calculations and deck or floor material selection—such as a concrete slab or tiled platform over 2x10 joists—are crucial to safely support the sauna's weight plus users.
- A basement sauna can become the centerpiece of a complete wellness zone when combined with cold plunges, red light therapy, and other accessories.
- Local building codes, electrical codes, and moisture management (vapor barriers, dehumidifiers) must be respected to avoid long-term structural issues and ensure safe operation.
- A basement sauna can be more cost-effective than an outdoor infrared sauna because it typically requires less weatherproofing and no additional foundation work.
Why Is a Basement Sauna a Smart Home Upgrade?
Across North America and Europe, homeowners are rediscovering their unfinished basements from the 1980s–2000s and transforming them into dedicated wellness spaces. What was once a cold, utilitarian storage area is becoming the new home gym, recovery zone, and relaxation hub—with a high-quality sauna at its center, tying everything together.
Privacy advantages make basement locations particularly appealing. Your sauna session stays completely separate from main living areas, which means early-morning heat therapy or late-night recovery sessions won't disturb sleeping family members.
The basement offers a natural buffer from the rest of the house. In addition, a basement sauna offers privacy and sound insulation, enhancing relaxation compared to an outdoor sauna, which may be more exposed to noise and weather.
Climate benefits work in your favor underground. Research shows that basements maintain cooler, more stable temperatures year-round compared to above-grade rooms. This thermal stability improves energy efficiency for both low-EMF infrared sauna models and traditional electric units—your sauna heater doesn't fight against summer heat radiating through walls or winter cold seeping through windows.
Property value increases by 10-25% when you add a finished wellness zone. Affluent, wellness-focused buyers increasingly prioritize homes with built-in recovery amenities. A thoughtfully designed basement sauna signals that a house was maintained by someone who invested in quality of life.
When comparing basements versus garages for sauna placement, basements typically win on privacy and year-round usability. Garages may offer easier access to outside ventilation, but they're subject to temperature swings and vehicle fumes and often lack the finished feel of a true spa environment.
How Do You Plan Your Basement Sauna Space?
Before selecting a model or ordering materials, grab a tape measure, notepad, and flashlight. Walk through your basement and sketch the future layout, noting existing features like support columns, electrical panels, water lines, and egress windows.
When planning, consider different basement layouts to ensure the sauna fits the available space and optimizes the basement's design for installation and usage. Compact saunas are often the most practical choice for basement installations due to limited space.
Ideal Square Footage by Sauna Size
Different configurations require different footprints:
- 4' x 4' (16 sq. ft.): Minimum for a 1–2-person infrared cabin—functional but compact.
- 5' x 6' (30 sq. ft.): Comfortable 2–3-person cabin-style sauna with room to stretch.
- 6' x 8' (48 sq. ft.): Family-sized traditional or infrared unit accommodating 4–6 users.
- Additional clearance: Plan for at least 36" on the entry side for comfortable door swing, plus 3–6" on non-door sides for assembly access and service.
Ceiling height emerges as a critical specification. The minimum acceptable height is 6 feet, though 7 to 8 feet is optimal for traditional saunas where heat stratification matters.
Many infrared models from SunHomeSaunas work comfortably under 7-foot ceilings—a significant advantage in older basements with lower clearances. Lower ceilings reduce the volume the heating system must heat, resulting in more efficient temperature maintenance at the bench level.
Plan your sauna location near an existing bathroom or shower when possible. This proximity allows for convenient cool-down and rinsing after sessions.
Safety note: Keep at least one clear path to an egress window or stairway. Never block emergency exits with your sauna footprint—this is both a code requirement and common sense.
Sample Dimensions and Clearances
- 6' x 10' room: Fits a 4' x 6' full-spectrum infrared cabin plus space for a cold plunge and seating bench.
- 8' x 12' room: Accommodates a 6' x 8' traditional sauna with dedicated shower corner and changing area.
- 10' x 14' room: Creates a complete wellness suite with sauna, cold plunge, stretching area, and storage.
- Service clearances: Maintain 3–6" from concrete or stud walls on non-door sides; 36" minimum front clearance for entry.
Modular cabins from SunHomeSaunas are designed to fit common basement bays, such as 8' x 12' finished rooms typical in 1990s suburban homes.
Match your available room dimensions to specific model dimensions before purchasing. The customer support team can help identify which units fit your exact space.
What Load Calculations and Structural Support Do You Need?
Even in a basement, confirming that your floor can safely support the sauna, users, and any adjacent cold plunge tub matters for long-term safety and peace of mind.
On a concrete slab basement (common in homes built after 1970), a standard 2–to 4-person infrared or traditional electric sauna typically falls well within the floor's capacity. Concrete slabs often handle 100 psf (pounds per square foot) or more without issue.
However, any raised deck, platform, or older timber floor section requires verification.
Consider both static loads (sauna structure, heater, benches, water in a cold plunge) and live loads (people moving in and out). A 4-person sauna with users inside creates significantly more concentrated weight than empty furniture.
For complex or older structures—particularly pre-1960 homes or basements with crawlspace sections—consulting a structural engineer is recommended. They can verify joist sizing, beam capacity, and identify any reinforcement needs.
SunHomeSaunas customer support provides approximate product weights and footprint data to assist with these calculations.
Basement Sauna Load Calculation Table
|
Setup |
Footprint (sq. ft.) |
Empty Weight (lbs.) |
In-Use Weight (lbs.) |
Load (psf) |
|
2-Person Infrared Sauna |
16 |
350–450 |
710–810 (+ 2 users @ 180 lbs. each) |
44–51 |
|
4-Person Traditional Sauna |
36 |
600–800 |
1,320–1,520 (+ 4 users @ 180 lbs. each) |
37–42 |
|
4-Person Sauna + 80-Gallon Cold Plunge |
50 |
1,100–1,300 |
2,367–2,567 (+ users + 667 lbs. water) |
47–51 |
Interpreting these numbers: Typical residential design loads run 40 psf for living areas and 50–60 psf for basement floors. If your calculated psf falls below these thresholds and the floor is in good condition, the structure is generally adequate.
Concrete slab-on-grade basements typically exceed these requirements by a significant margin.
Do not overload small-framed platforms with heavy, concentrated equipment, such as water-filled plunge tubs. Spread loads appropriately or reinforce as needed.
Deck and Platform Material Requirements
A deck or platform becomes necessary when you need to:
- Level an uneven concrete slab.
- Create a raised landing in a partially finished basement.
- Visually separate the sauna zone from an adjacent workout or gym area.
Recommended framing materials:
- Pressure-treated or kiln-dried 2x8 or 2x10 joists at 16" on center for small raised platforms.
- Appropriate blocking between joists for added rigidity.
- Concrete anchors or fasteners into supporting walls where applicable.
Deck surface materials should be non-combustible or moisture-resistant:
- Cement backer board with tile overlay.
- Porcelain or ceramic tile.
- Sealed natural stone.
- Avoid: carpet, unsealed hardwood, or laminate in the sauna zone.
Any wood used in a platform or step near the sauna door should be exterior-grade or pressure-treated and properly sealed on all faces. This protects against moisture from steam, sweat, and occasional splashes from a nearby cold plunge.
For heavier installations, confirm joist sizing and spacing using span tables or a contractor's input. Adding 4x4 support posts can reduce spans and distribute weight more effectively across the slab below.
How Do You Manage Moisture, Insulation, and Vapor Control?
Moisture control represents the main risk factor in basement sauna projects. Effective management protects framing, drywall, and insulation from mold and rot over the long term—preserving both your investment and your home's structural integrity.
Traditional electric saunas produce hotter air and generate more humidity when water is poured onto heated rocks. Infrared saunas operate with dry heat and lower ambient humidity, though sweat still introduces some moisture into the space.
Both types require attention to moisture management, just at different intensities.
Before any installation begins:
- Inspect for existing moisture issues (water stains, musty smell, white efflorescence on concrete walls).
- Resolve drainage problems or apply waterproofing treatments.
- Address any foundation cracks or seepage points.
- Test humidity levels over several days in different weather conditions.
Finished sauna rooms in basements should use closed-cell foam or mineral wool (rockwool) insulation where possible. Rockwool demonstrates superior moisture resistance, non-flammability characteristics, and a higher R-value compared to fiberglass—making it ideal for high heat applications.
A correctly installed foil or poly vapor barrier goes on the warm side of the sauna walls and ceiling. Aluminum foil barriers reflect radiant heat back into the chamber (improving efficiency by 10–20%) while providing completely impermeable moisture protection.
Include a stand-alone dehumidifier in the larger basement space outside the sauna to manage post-session humidity, especially in humid climates like the US Midwest or Southeast.
Moisture Barriers and Wall Assemblies
A typical wall build-up for a traditional sauna within a basement follows this sequence:
- Existing concrete or stud wall.
- Additional studs if creating a new enclosure (2x4 or 2x6 at 16" on center).
- Mineral wool insulation filling cavities.
- Foil-faced vapor barrier with 2" overlaps at seams, sealed with high-temperature aluminum tape.
- Interior sauna-grade tongue-and-groove wood (hemlock or cedar).
Infrared cabins from SunHomeSaunas are often self-contained structures with their own insulated wall systems. However, the surrounding basement walls still benefit from proper insulation and moisture control to maintain the overall environment.
Important: Avoid sandwiching moisture between two vapor barriers. One primary vapor barrier on the warm side of the sauna is usually preferred. Check local codes for specific requirements in your area.
Use moisture-resistant drywall or cement board for exterior (non-sauna) walls around the sauna zone, especially near showers or cold plunges.
Flooring Choices for Basement Saunas
Durable, moisture-safe flooring options include:
- Sealed concrete: Cost-effective, extremely durable, easy to clean.
- Porcelain or ceramic tile: Classic spa aesthetic, wide range of styles, excellent moisture resistance.
- Luxury vinyl tile (LVT): Budget-friendly, comfortable underfoot, rated for wet areas.
- Natural stone: Premium appearance, extremely durable when properly sealed.
Select non-slip textures for safety when feet are wet. Avoid carpeting, traditional hardwood, or cheap laminate in the immediate sauna and cool-down area—these materials trap moisture and invite mold growth or warping.
Inside the cabin itself, add a removable duckboard or sauna mat for comfort and drainage. These should be made from sauna-safe wood, such as hemlock, cedar, or treated basswood.
If installing a shower or cold plunge nearby, plan for a slight floor slope (1–2%) toward a drain. All drains must incorporate proper traps and venting, installed by a licensed plumber.
What Ventilation and Air Circulation Does a Basement Sauna Need?
Fresh air is essential for comfort, safety, and mold prevention—especially in enclosed, below-grade rooms. Proper ventilation ensures oxygen replenishment during sessions and removes humid air afterward.
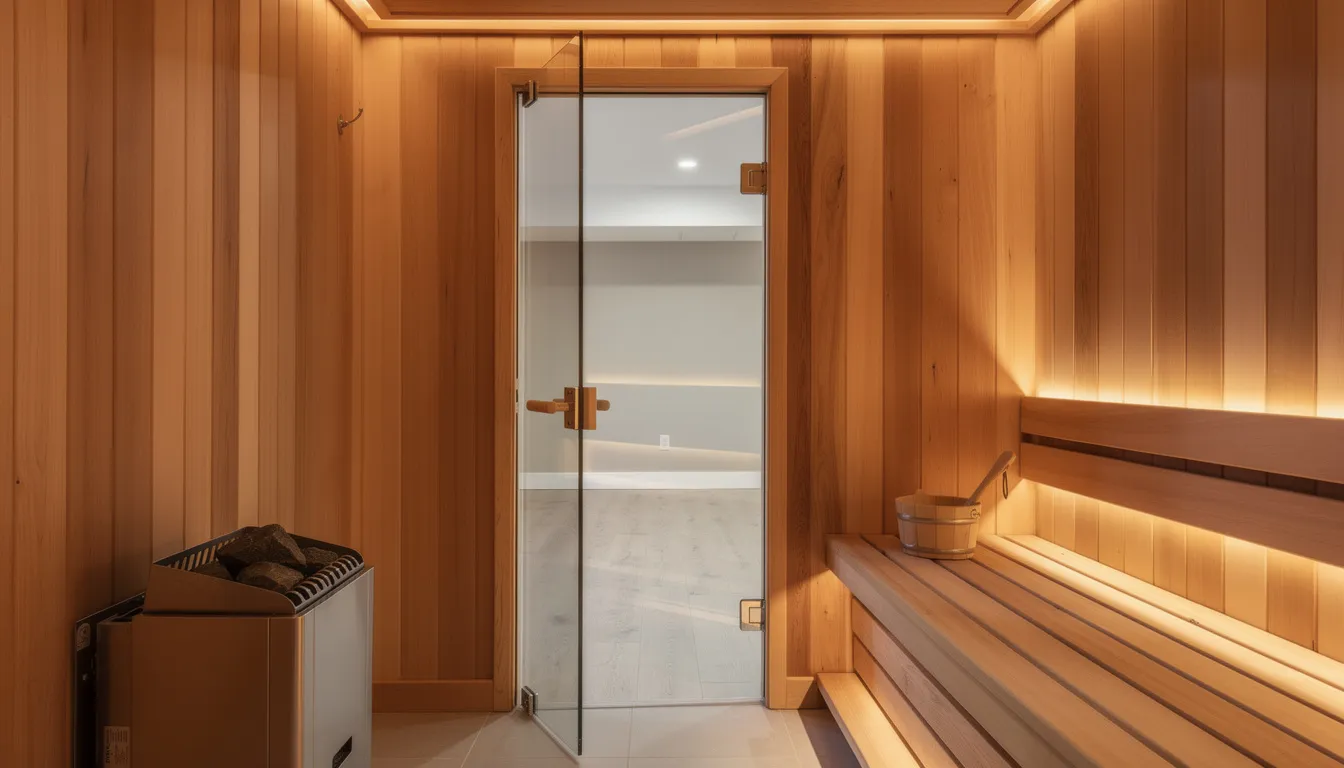
Traditional saunas typically use an intake vent near the heater (usually low on the wall, about 6 inches from the floor) and an exhaust vent high on the opposite wall. The exhaust ideally ducts to a larger basement space or to the outdoors.
Infrared saunas produce less steam but still need some air exchange. Many infrared cabins come with built-in venting panels that should remain unblocked. The surrounding basement space must also maintain adequate airflow.
Pair your sauna with a small, quiet exhaust fan in the main basement space, controlled by a timer. Set it to run for 15–30 minutes after each session to remove excess humidity.
In very tight or newly sealed basements, consider an HRV/ERV (heat or energy recovery ventilator) to improve air quality for the entire level while maintaining energy efficiency.
Vent Routing and Dehumidification
Effective vent routing guidelines:
- Direct sauna exhaust toward an exterior wall or larger, well-ventilated room.
- Avoid dumping moist air into small closets, dead-end spaces, or near HVAC returns.
- Use rigid or semi-rigid ducting for longevity and easier cleaning.
- Seal any penetrations through fire-rated assemblies with appropriate fire-rated materials.
For the broader basement area, add a humidity-controlled dehumidifier set to approximately 45–50% relative humidity. Models with a hose connections to a floor drain or condensate pump eliminate the need for manual emptying.
SunHomeSaunas units are engineered for efficient heat retention, meaning proper ventilation complements rather than undermines energy efficiency. Check manufacturer recommendations on vent sizing and placement for your specific model—specifications vary between traditional and infrared designs.
How Do You Choose the Right Basement Sauna Type?
The choice between a traditional Finnish-style sauna and a full-spectrum infrared sauna for sale affects everything from installation complexity to your daily sauna experience.
Traditional saunas reach higher temperatures (160–195°F) and generate steam by ladling water over heated rocks. The ritual aspect—the sizzle of water, the burst of humid heat, the aromatic steam—appeals to purists and those who love the classic sauna experience.
Infrared saunas operate at lower air temperatures (120–150°F) while delivering deep, penetrating warmth through infrared light waves. Many users find this gentler heat more comfortable for longer sessions, and the lower ambient humidity makes moisture management in basements easier.
Basement-specific constraints often make infrared or 20A dedicated circuit full-spectrum units particularly attractive:
- Lower ceiling requirements (many work under 7-foot ceilings).
- Simpler electrical needs (120V for smaller units).
- Faster installation (often under 2 hours).
- Lighter weight (easier on older structures).
SunHomeSaunas models emphasize low-EMF infrared sauna heaters, sustainable woods, and easy assembly—all key considerations for indoor residential spaces where safety and aesthetics matter equally.
Infrared and Full-Spectrum Basement Saunas
A typical 2-person full-spectrum infrared cabin from SunHomeSaunas can be carried in panels down a standard 36" basement stair and assembled in under an hour using basic screwdriver-level tools. No special equipment or professional construction experience required.
Benefits of basement installation:
- Lower surface temperatures on exterior walls reduce the risk of heat damage to surrounding materials.
- Less ambient humidity means simpler vapor barrier requirements.
- Lighter total weight rarely requires structural reinforcement.
- 120V/20A dedicated circuit power for many 1–2 person models.
Low-EMF heating elements and even heat distribution set quality infrared units apart from cheaper alternatives online. Budget infrared boxes often create hot spots, uneven heating, and higher electromagnetic field exposure.
Optional upgrades that enhance the sauna experience include:
- Integrated red light therapy panels.
- Bluetooth audio systems.
- Chromotherapy LED lights.
- Carbon/ceramic heater combinations for full-spectrum coverage.
Best for:
- Busy professionals wanting quick recovery sessions.
- Biohackers tracking specific health metrics.
- Compact urban basements with space limitations.
- First-time sauna owners preferring 20A dedicated circuit simplicity.
- Households prioritizing energy efficiency.
Traditional Electric Basement Saunas
Traditional saunas demand more from the installation process but deliver the authentic Finnish experience many enthusiasts crave.
Key requirements:
- 240V dedicated circuit (30–40A typical).
- Professional electrician for installation.
- Higher ceiling clearance (7–8 feet preferred).
- More intensive vapor barrier and insulation for the hot room.
- Proper ventilation system with intake and exhaust.
A 4.5–6 kW electric heater with stones can comfortably serve a 4–6-person cabin with a 6' x 8' footprint—a size that fits well in suburban basement remodels. While air temperatures can run higher (160–195°F), actual moisture levels remain manageable in a well-ventilated basement with proper use patterns and post-session airing.
The ritual aspect makes traditional saunas a social gathering spot for family and friends. The ladle, bucket, and aroma infusions (birch, eucalyptus, pine) create sensory experiences that infrared simply cannot replicate.
SunHomeSaunas works with premium heater brands and uses thick, sustainably sourced sauna woods to maintain consistent heat and minimize hot spots throughout the cabin.
Should You Build a DIY or Pre-Built Basement Sauna?
When planning a basement sauna, one of the first choices many homeowners face is whether to build a DIY sauna or invest in a pre-built model. Each approach offers unique advantages, and the best option often depends on your basement layout, available time, and comfort with home improvement projects.
A DIY sauna gives you the freedom to tailor every detail to your specific needs. This flexibility is especially valuable in basements with unconventional shapes or smaller spaces, where a standard kit might not fit perfectly.
With a DIY approach, you can design custom benches, select your preferred materials, and optimize the sauna's footprint to make the most of your unused space. However, building your own sauna requires a solid understanding of moisture control, insulation, and electrical work.
On the other hand, pre-built home saunas are designed for quick and efficient basement installation. These models often come as 20A dedicated circuit kits, minimizing the need for specialized tools or construction expertise.
For many homeowners, the convenience and reliability of a pre-built sauna outweigh the benefits of customization. Pre-built units are engineered for optimal performance, with integrated moisture barriers and safety features, making them a smart choice for those who want a hassle-free installation and peace of mind.
Ultimately, your decision comes down to your priorities. If you enjoy hands-on projects and want a truly personalized sauna experience, a DIY sauna can be a rewarding way to utilize your basement.
If you prefer a streamlined process with guaranteed results, a pre-built sauna offers efficiency and professional-grade moisture control—ideal for busy homeowners or those new to sauna construction.
What Are the Electrical and Safety Considerations?
All electrical work for sauna systems must comply with local code and should be performed or reviewed by a licensed electrician. This isn't an area where cost-cutting pays off—improper electrical setup creates genuine fire and safety risks.
Power Requirements by Sauna Type
|
Sauna Type |
Typical Circuit |
Notes |
|
1–2 Person Infrared |
120V, 15–20A dedicated |
Often plug-in ready |
|
Large Infrared (3+ person) |
240V, 20–30A dedicated |
Hardwired installation |
|
Traditional Electric |
240V, 30–50A dedicated |
Always hardwired |
GFCI protection is required when the sauna is near a shower, cold plunge, or any plumbing. Some jurisdictions require GFCI protection for all sauna circuits regardless of proximity to water.
Plan wiring runs before finishing basement walls and ceilings. Retrofitting electrical work after completing drywall adds high cost and disruption.
SunHomeSaunas provides rough-in specs for each model to help electricians plan appropriately.
Safety elements to verify:
- Temperature limiters that prevent overheating.
- Timer controls that automatically shut down after a preset duration.
- Ventilation interlocks where required by code.
- Proper clearances from combustible materials around heaters (typically 6" minimum).
Lighting, Controls, and Accessories
Appropriate lighting transforms a functional sauna into a spa-like retreat. Use IP-rated fixtures—at least IP65 — for the sauna interior and surrounding high-humidity zones.
Indirect lighting, such as hidden LED strips, is recommended to eliminate shadows and create a more relaxing atmosphere. Dimmable lighting is preferred in saunas so users can adjust the ambiance from bright to soft.
Interior lighting options:
- Dimmable warm-white LED strip lights under benches.
- Recessed ceiling fixtures rated for high heat environments.
- Chromotherapy color-changing LED lights for mood enhancement.
- Natural light from glass door panels during daytime sessions.
Temperature and timer control panels should be located just outside the sauna or in cooler zones, following manufacturer guidance. Many modern controls integrate with smart home systems, allowing Wi-Fi preheating while you're on your way home from a workout.
Essential accessories for an elevated basement sauna build:
- Thermometer/hygrometer for monitoring conditions.
- A towel warmer mounted nearby.
- Robe hooks at accessible heights.
- Storage bench for towels and accessories.
- Non-slip rugs outside the door.
- Sand timer for tracking session duration.
- Bucket and ladle set (traditional saunas).
- Essential oil diffuser or sauna aromatherapy drops.
How Do You Enhance the Sauna Experience with Rituals and Aromatherapy?
A basement sauna is more than just a source of heat—it's a sanctuary for relaxation, rejuvenation, and self-care. To truly elevate your luxury home sauna experience, consider incorporating rituals, aromatherapy, and thoughtful lighting design into your routine.
Start by establishing simple rituals that signal the transition from daily life to relaxation. Many homeowners enjoy taking a cool shower before entering the sauna, or practicing deep breathing and meditation while in the sauna.
These small acts can help you unwind and maximize the benefits of your personal sauna.
Aromatherapy is another powerful way to enhance your sauna sessions. Adding a few drops of essential oils like eucalyptus, pine, or lavender to the steam or air can create a soothing atmosphere and support respiratory wellness.
This sensory layer transforms your basement sauna into an excellent location for both physical and mental relaxation.
Lighting also plays a crucial role in setting the mood. Installing sauna lights or LED strip lighting under benches or along the walls can create a warm, inviting glow that makes the space feel cozy and luxurious.
LED strips are especially popular for their energy efficiency and ability to highlight architectural features, making even smaller spaces feel special.
By combining these elements—rituals, aromatherapy, and creative lighting—you can turn your basement sauna into a true retreat.
How Do You Design a Complete Basement Wellness Suite?
Imagine walking down to your basement and entering a cohesive wellness space: a warm sauna on one side, an invigorating cold plunge steps away, a stretching and yoga space in the corner, perhaps a compact gym area with kettlebells and a bench.
This isn't fantasy—it's what many homeowners are creating with SunHomeSaunas products as the foundation.
A cold plunge tub pairs naturally with a basement sauna. The proximity makes contrast therapy (alternating hot and cold) practical for daily use.
Basements offer easy plumbing access, stable ambient temperatures that reduce chiller energy consumption, and typically the structural capacity to handle water weight on concrete slabs.
Red light therapy panels or a sauna blanket in an adjacent area extend your recovery options for days when a full sauna session doesn't fit the schedule. These can be mounted on walls or stored compactly when not in use.
Design cues for a polished basement wellness space:
- Warm wood tones on the sauna cabin contrast with neutral tiles.
- Polished or sealed concrete flooring for durability.
- Soft indirect lighting throughout (avoid harsh overhead fluorescents).
- Simple, cohesive color palette—think spa neutrals with natural wood accents.
- Hidden storage for towels, robes, and products.
- Quality ventilation and dehumidification for the entire level.
The SunHomeSaunas product range and support team can help with model selection, room planning, and installation coordination to create your ideal wellness suite.
What Are the Steps for Installing a Basement Sauna?
While many SunHomeSaunas models are DIY-friendly, proper planning and adherence to instructions ensure a safe, long-lasting installation that performs as designed.
High-level installation flow:
- Step 1: Assess space and structure—Confirm dimensions, ceiling height, floor condition, and load capacity.
- Step 2: Confirm electrical capacity—Have an electrician evaluate your panel and plan circuit additions.
- Step 3: Address moisture and insulation—Resolve any existing moisture issues, install vapor barriers as needed.
- Step 4: Prepare floor and any deck—Level surfaces, install tile or appropriate flooring, build platforms if necessary.
- Step 5: Assemble sauna—Follow manufacturer instructions—typically panel-by-panel for infrared cabins.
- Step 6: Connect power—Professional installation for 240V; plug-in for qualifying 120V models.
- Step 7: Test operation—Run through heating cycles, check controls, and verify ventilation.
- Step 8: Add finishing touches—Install accessories, lighting, and surrounding décor.
Time estimates:
- Infrared cabin assembly: 45–90 minutes for two people.
- Traditional kit builds: 4–6 hours plus electrical and finishing work.
- Complete room preparation (framing, insulation, flooring): 2–5 days, depending on starting condition.
Photograph each stage—framing, wiring, vapor barrier installation—for future reference and to document compliance for any inspections.
If you're not confident in DIY construction, combine SunHomeSaunas' guidance with a local contractor or handyman. The product manuals provide clear specifications that any competent tradesperson can follow.
Final Checks and Commissioning
Before your first real session, complete this checklist:
- [ ] All electrical connections inspected and approved.
- [ ] Temperature limiter function verified.
- [ ] Ventilation paths confirmed and unobstructed.
- [ ] Vapor barrier inspected for gaps (especially corners and penetrations).
- [ ] Door swing and closure tested (should close fully but not stick).
- [ ] Heater clearances verified against specifications.
- [ ] Controls operating correctly.
Initial conditioning: Run the sauna empty at full temperature for 1–2 complete cycles. This off-gases any packaging residues from wood or heaters and seasons the interior before you use it.
Measure actual operating temperatures at user head height and bench height to confirm performance matches model specifications.
Start gradually: Set initial session durations at 10–15 minutes and gradually increase as you acclimate. High heat in traditional saunas can be intense for newcomers—respect your body's signals.
Maximize Your Investment with Proper Sauna Care
Your basement's unused space is waiting to become something extraordinary. With careful planning for structure, moisture, and electrical needs, a basement sauna transforms underutilized square footage into a daily wellness retreat.
Whether you choose a 20A dedicated circuit infrared cabin for quick installation or a traditional electric sauna for the authentic Finnish experience, the result is the same: a personal sanctuary for relaxation, recovery, and enhanced well-being—all within your own home.
Ready to transform your basement into a wellness retreat? Visit SunHomeSaunas today to find the perfect model for your basement, or contact the customer support team for personalized guidance on room planning and installation.
Frequently Asked Questions
Do I need a building permit for a basement sauna?
Many jurisdictions in the US, Canada, and the EU require permits for new electrical circuits, structural changes, or added plumbing—even when the sauna itself is a prefabricated kit that needs no construction. The electrical work for a 240V heater almost always requires a permit and inspection.
Check with your local building department and any applicable HOA before starting. Permits help ensure safety and become important during future home sales or insurance claims. An unpermitted electrical installation can void insurance coverage if something goes wrong.
Will a basement sauna cause mold or dampness problems?
A properly installed sauna with correct vapor barriers, insulation, and ventilation should not create mold issues. The sauna itself gets hot enough during operation to inhibit mold growth, and proper post-session practices prevent problems.
Key practices include airing out the sauna after use by propping the door open, running an exhaust fan in the surrounding space, maintaining basement humidity at 45–50% with a dehumidifier, and wiping down benches after each session.
Existing water intrusion problems must be fixed before installation. A sauna will not mask foundational moisture issues—it will make them worse by adding more moisture to an already compromised environment.
Can I put a cold plunge next to my basement sauna?
Yes, as long as structural load, waterproofing, and plumbing are correctly addressed. Concrete slabs are best suited to this configuration due to their inherent load capacity and moisture resistance.
A 70–100-gallon cold plunge adds 600–900 pounds of water weight alone. Combined with the tub itself and occasional users, load calculations become essential. Build robust platforms or confirm slab capacity before installation.
Equip the area with non-slip flooring, floor drains where permitted, and GFCI-protected circuits for any pumps, chillers, or filtration systems associated with the cold plunge.
How much does it cost to run a basement sauna each month?
Operating costs depend on heater size, session frequency, and local electricity rates.
Example calculations (at $0.15/kWh):
|
Usage Pattern |
Power Draw |
Monthly Cost |
|
2-person infrared, 4 sessions/week @ 45 min |
~2 kW |
$9–12 |
|
4-person traditional, 3 sessions/week @ 30 min |
~5 kW |
$15–22 |
|
Daily infrared use, 30 min sessions |
~2 kW |
$15–20 |
Basements' stable starting temperatures slightly reduce energy consumption compared to outdoor saunas or unheated garage installations, where the heater must overcome greater temperature differentials.
What maintenance does a basement sauna require?
Sauna maintenance is minimal but consistent.
After each session:
- Wipe down benches and backrests with a towel.
- Prop the door open to air out the interior.
- Run exhaust fan or dehumidifier.
Monthly:
- Deep clean with mild, sauna-safe cleaners (no harsh chemicals).
- Check for any unusual odors or visible moisture issues.
Annually:
- Inspect door hardware, hinges, and seals.
- Check fasteners and tighten if needed.
- Have heaters and control panels inspected per the manufacturer's schedule.
- Look for signs of excess moisture on surrounding walls and ceilings.
Any electrical issues—flickering lights, controls that are not responding, or unusual heating patterns—should be promptly addressed by a qualified electrician.
References
- ResearchGate – “Evaluation of Basement’s Thermal Performance Against Thermal Comfort Model at Hot-Arid Climates, Case Study.”
- Lofty – “Home Wellness Infrastructure Boosts Property Value.”
- American Legal Publishing – “Sauna Room Local Codes.”
- Healthline – “Infrared Sauna: 9 Possible Health Benefits.”
- HomeSauna – “What You Need to Know Before Building a Basement Sauna”
